★ 1-Star Battery Data#
This lesson demonstrates how to publish a battery dataset to the Zenodo Sandbox using their REST API. This corresponds to Star One in the Five-Star Battery Data recommendation.
What does one-star mean?#
In the 5-Star Battery Data framework, 1-star data is:
Published to a public repository (e.g., Zenodo), and
Assigned a clear, permissive license for reuse (e.g., CC-BY 4.0)
This notebook demonstrates how you can achieve your first star.
Watch#
What is a public repository?#
A public repository is an open-access platform where research data can be deposited, described, and shared with others. It ensures that your dataset is openly accessible, citable, and preserved long-term by assigning a persistent identifier such as a DOI. Public repositories require key descriptive metadata—including title, abstract, keywords, licensing, and creator information—formatted in a machine-readable way to support indexing and reuse. Platforms like Zenodo support these features natively and allow metadata enrichment with identifiers such as ORCID (for authors) and ROR (for institutions), promoting clarity and credit attribution.
Why is this important?#
Publishing your data in a public repository significantly increases its visibility, trustworthiness, and impact. A persistent identifier ensures others can reliably cite your dataset, while the repository guarantees long-term access and preservation. By including rich, standardized metadata, your dataset becomes easier to find, integrate, and reuse within research infrastructures, knowledge graphs, and semantic search tools—supporting the broader goals of open science and FAIR data.
What we will do#
In this notebook, we will:
Load your Zenodo Sandbox access token securely from a
.envfileDefine dataset metadata including creator names, ORCID, affiliation, and license
Create a deposition in the Zenodo Sandbox via the API
Upload a structured
.csvbattery data filePublish the dataset and obtain a shareable DOI-like URL
What is the Zenodo Sandbox?#
The Zenodo Sandbox is a publicly available test server that mimics the real Zenodo publishing platform. It allows you to safely practice uploading datasets, registering metadata, and minting DOIs—without affecting the live site or making anything publicly visible.
You can upload data in two ways:
Via the web interface – a user-friendly option ideal for one-time or manual uploads.
Via the API – a powerful method for automating uploads, especially useful when publishing many datasets or integrating Zenodo into your data processing pipeline.
While the web interface is convenient, setting up a pipeline through the API is much more efficient and scalable for frequent or large-volume uploads. In this notebook, we will demonstrate how to use the API.
Zenodo Sandbox URL: https://sandbox.zenodo.org
What is an Access Token and Why Do I Need One?#
An access token is like a digital key that lets your code talk to Zenodo on your behalf. Instead of logging in with a username and password, you use this token to securely connect to Zenodo’s system—especially when using automated tools or scripts.
It tells Zenodo who you are and what you’re allowed to do, such as:
Uploading files
Editing metadata
Publishing or updating records
This is essential when using the Zenodo Sandbox API to automate your data publishing workflow. Without an access token, Zenodo won’t know who’s making the request or whether they have permission.
How to Create an Access Token#
Before using the API, you need a personal access token to authenticate your requests. Here’s how to create one:
Go to https://sandbox.zenodo.org and sign in (you may need to register an account).
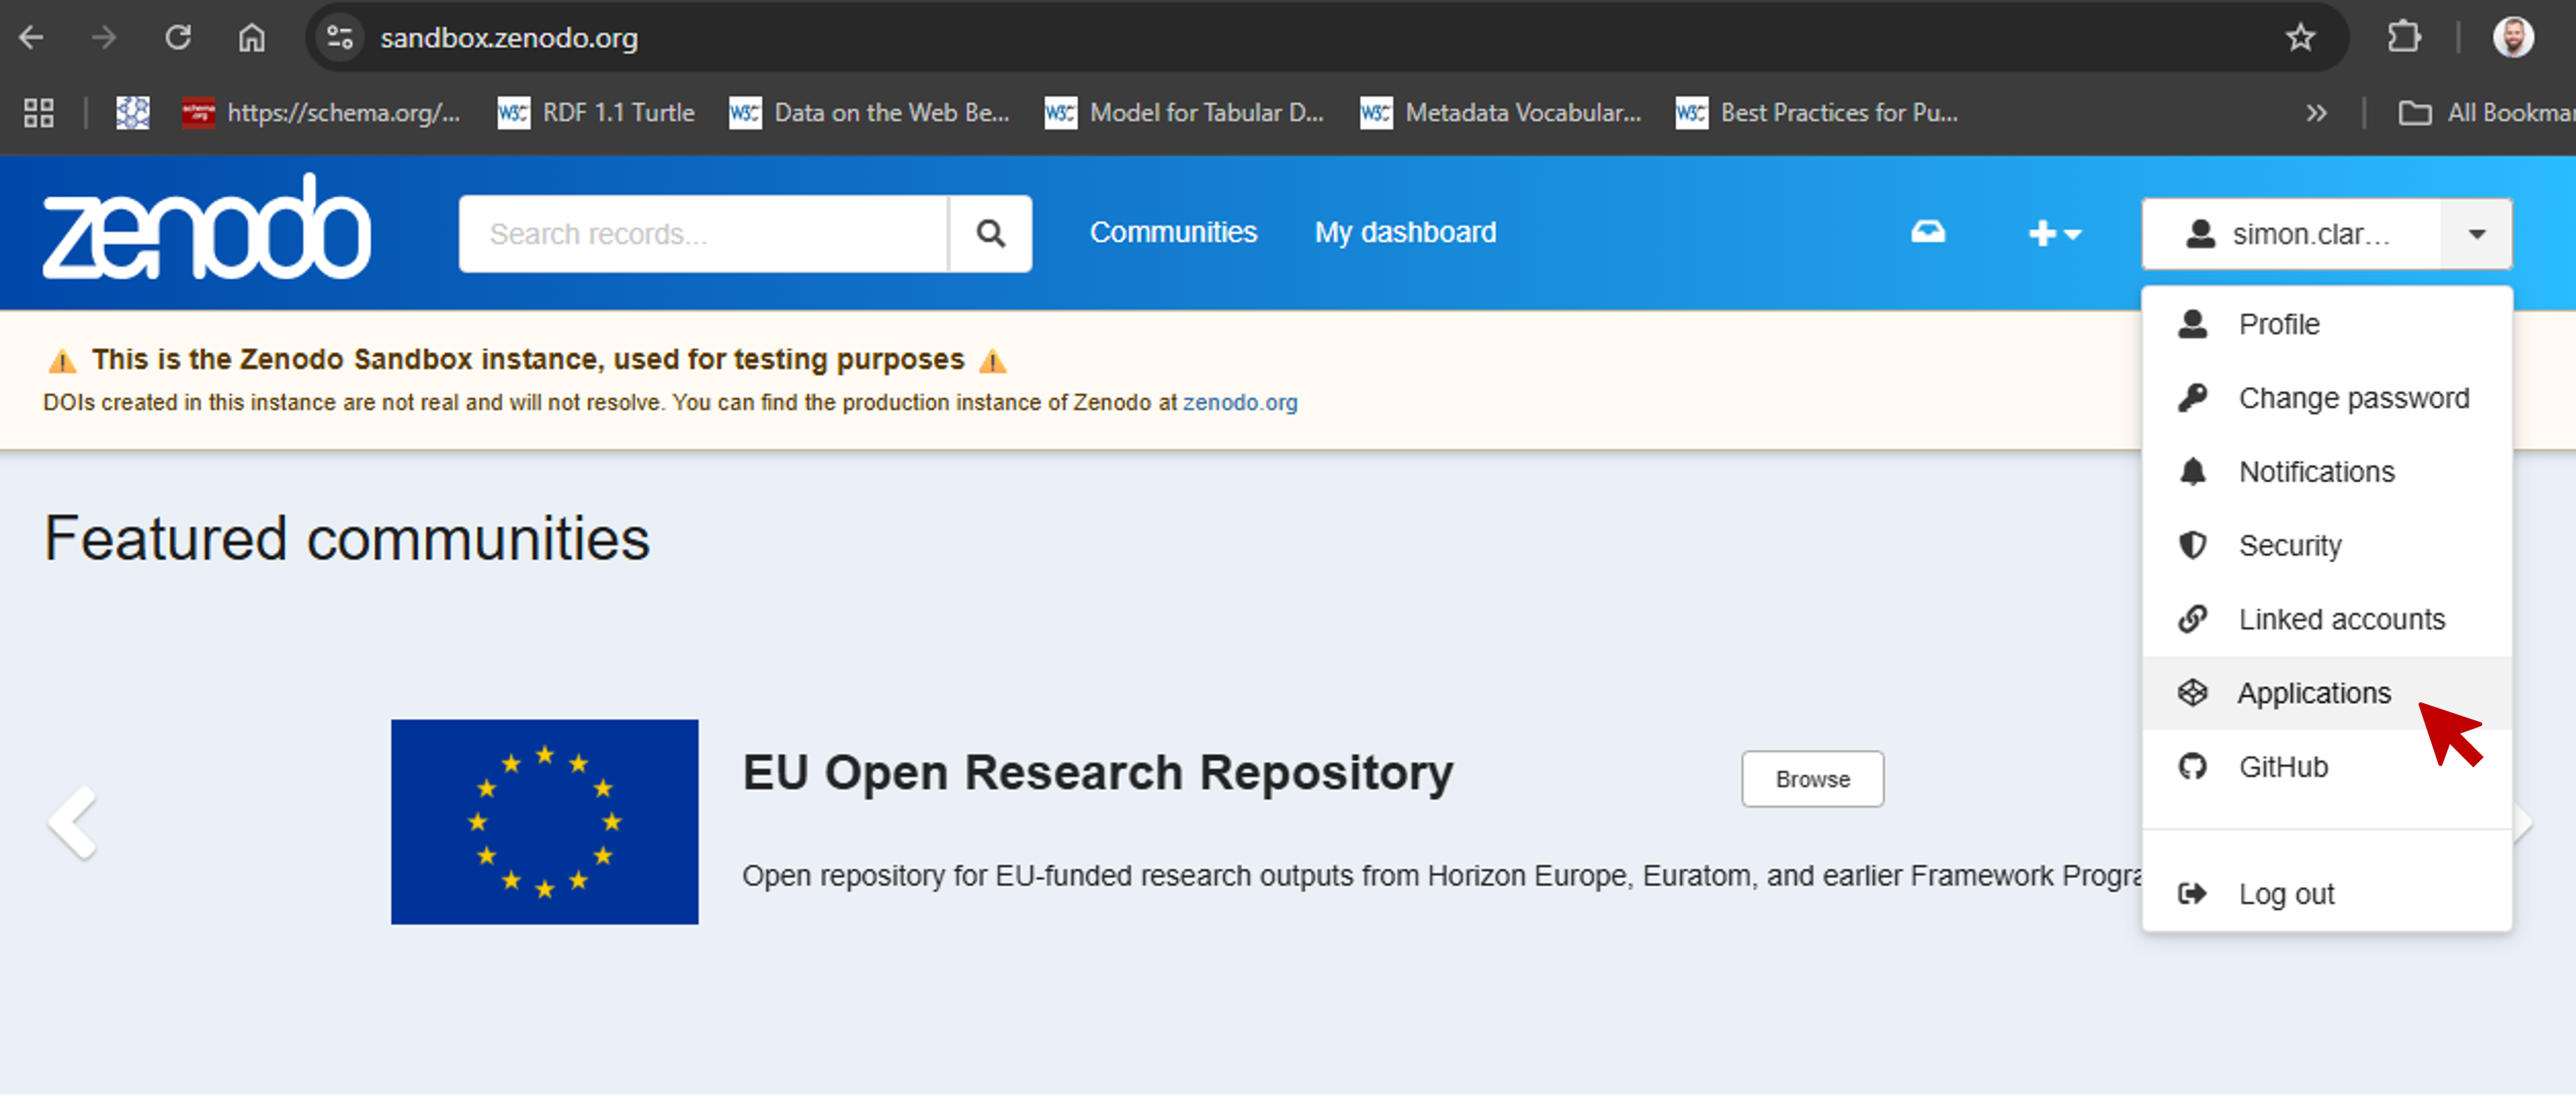
Click your profile icon and choose Applications.
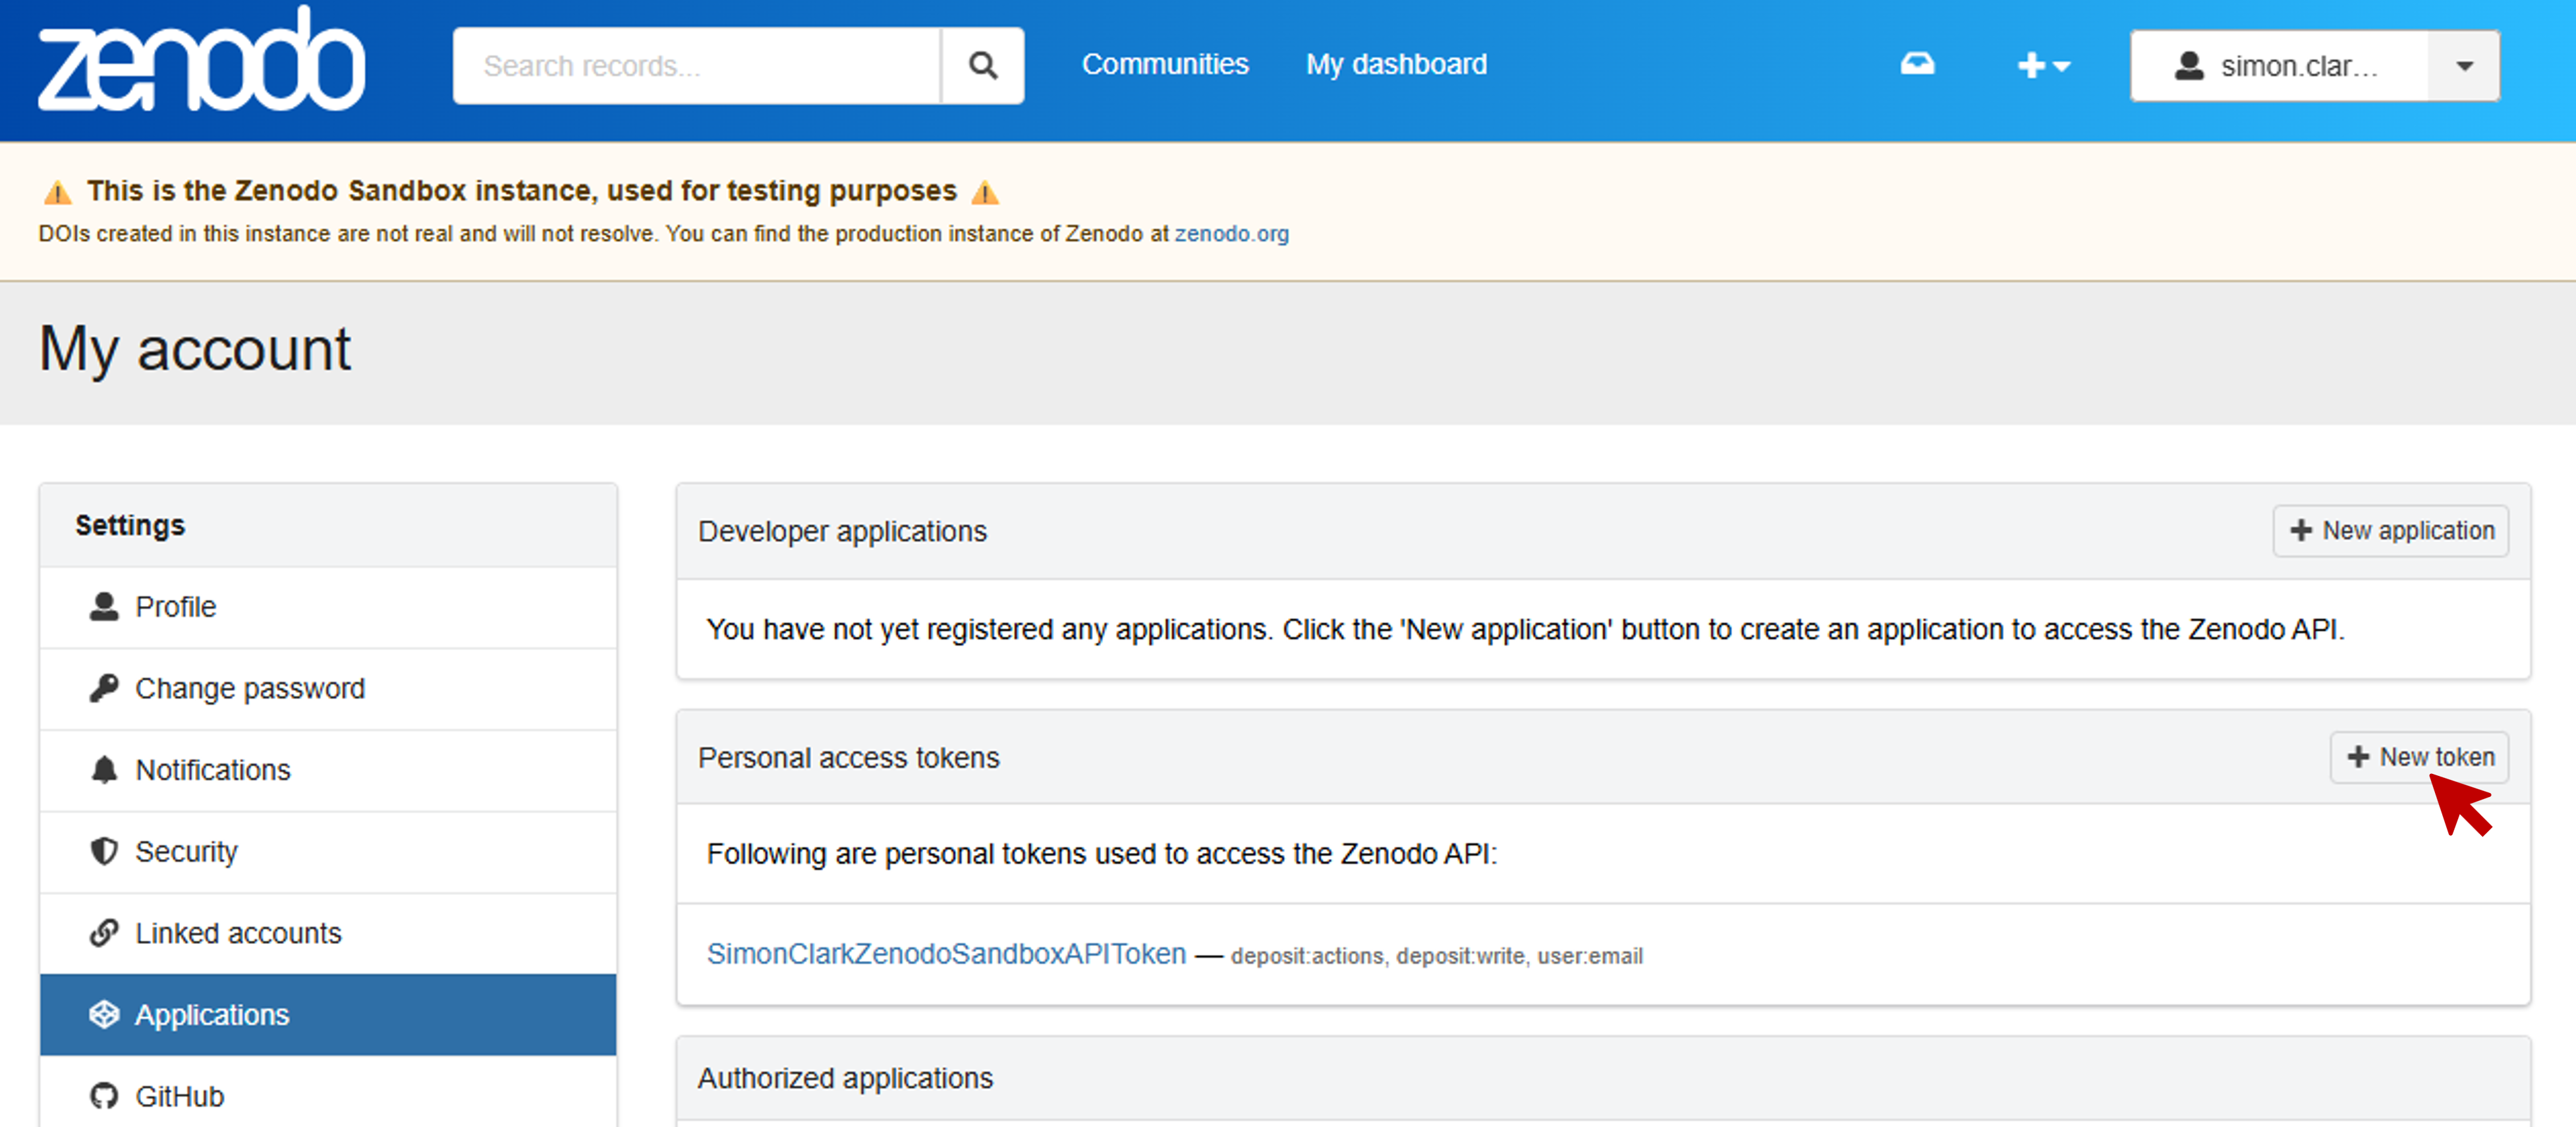
Click New Token.
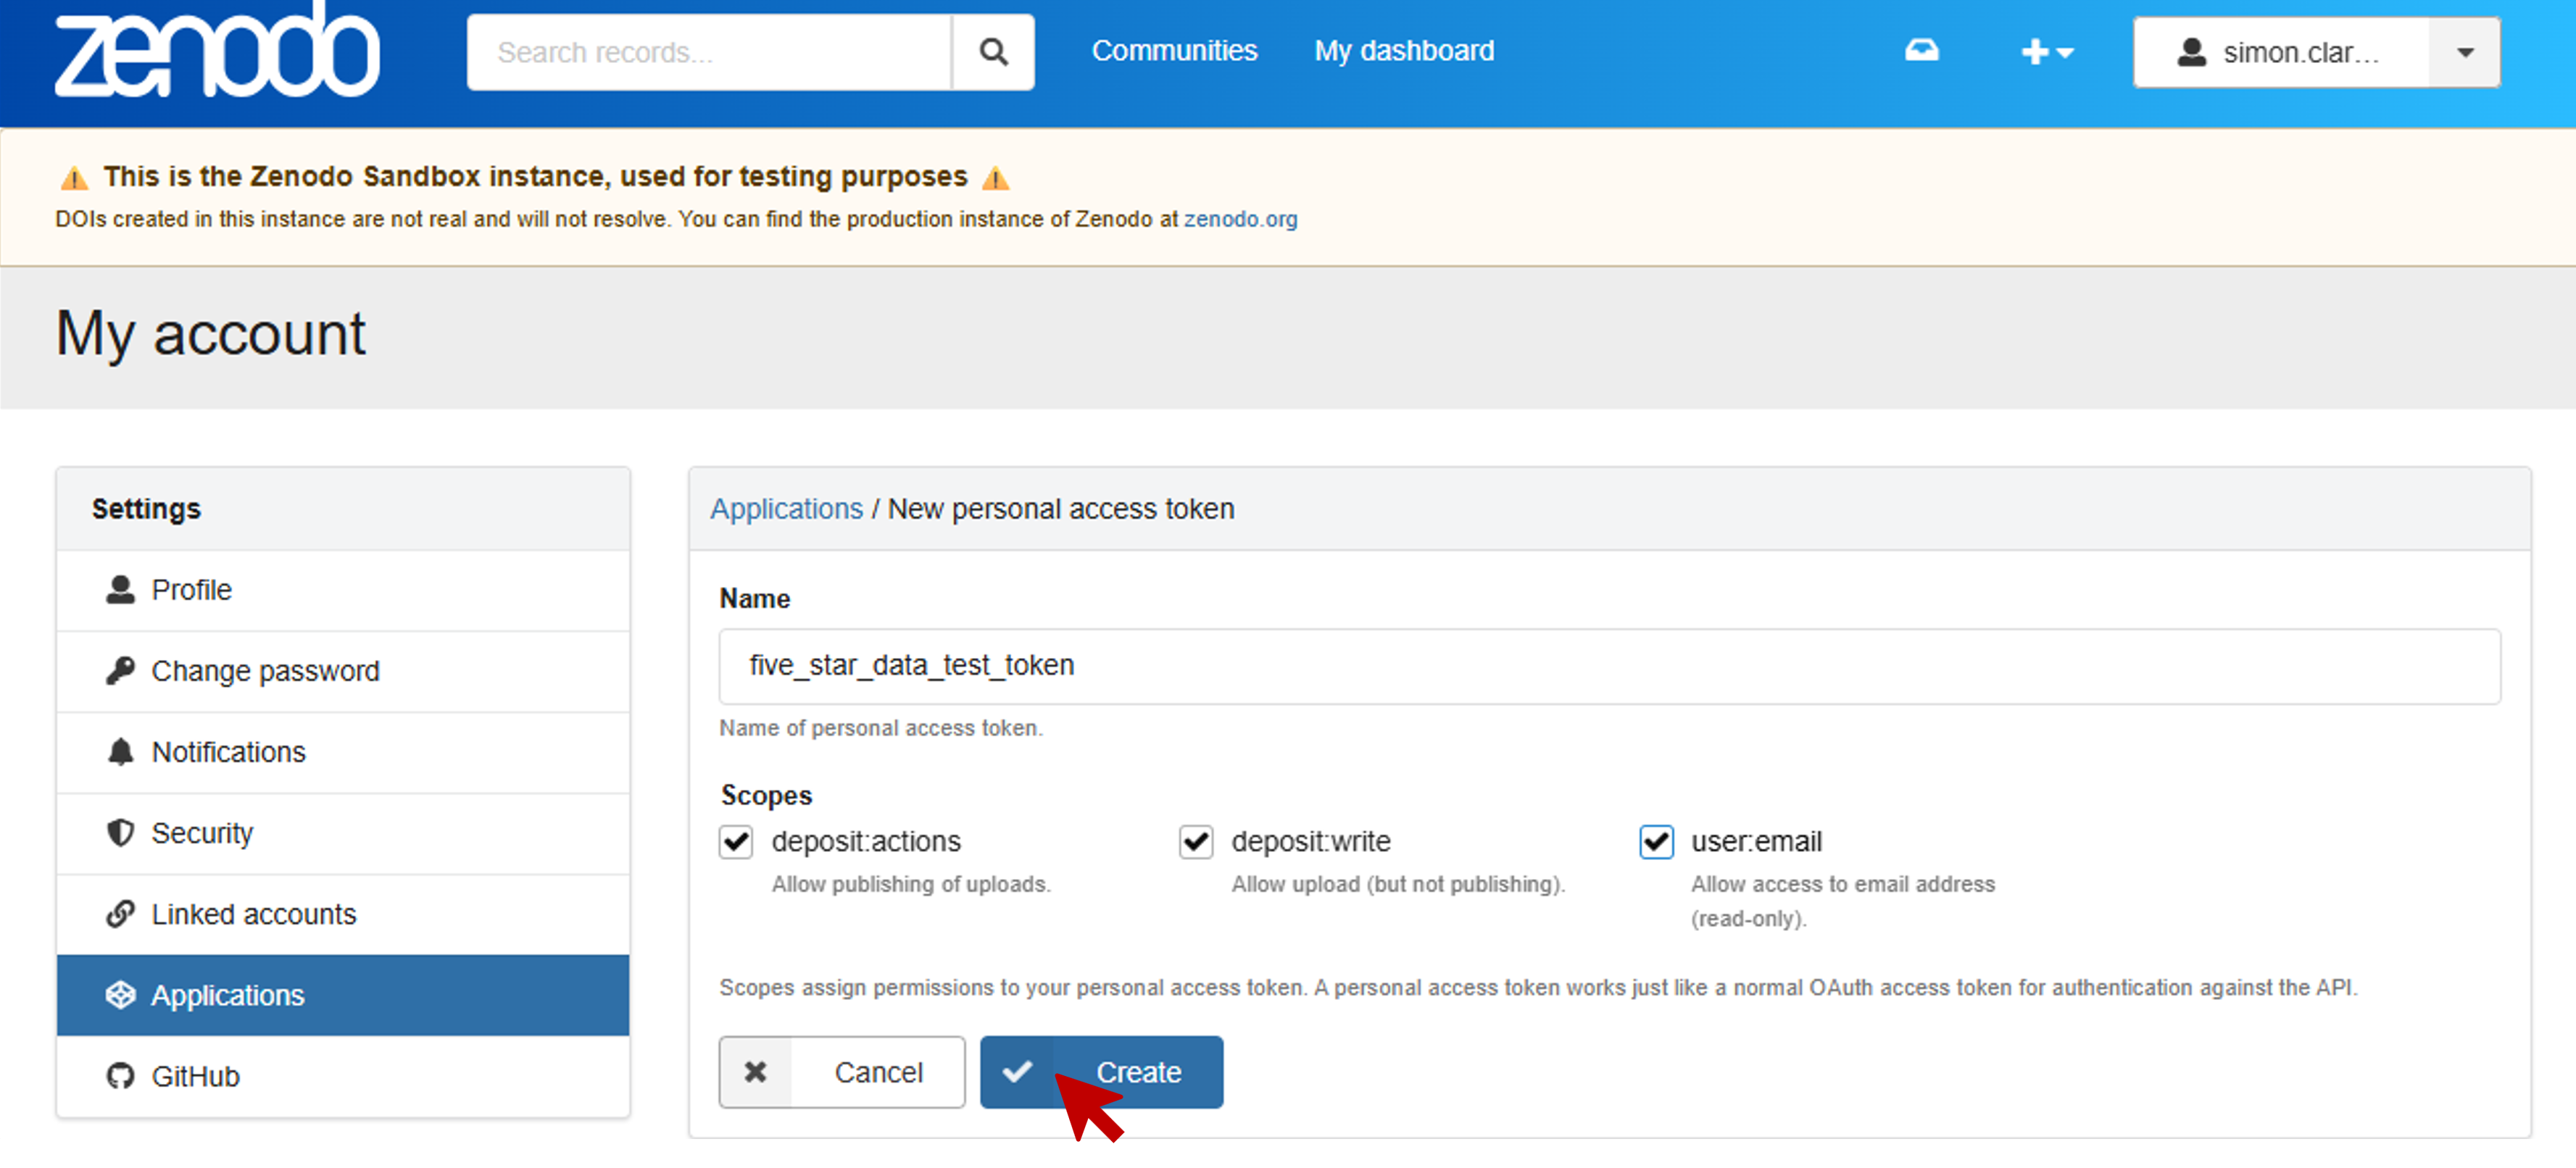
Give it a name like
"five_star_data_test_token".Enable the following scopes:
deposit:write(upload new data)deposit:actions(publish data)user:email(optional, to identify yourself)
Click Create and copy the generated token.
Load Access Token#
To keep your token secure, you should store it in a .env file rather than hardcoding it into this notebook. Open the .env file that accompanies this notebook and paste your token into the following field:
ZENODO_SANDBOX_TOKEN=paste_your_sandbox_token_here
[9]:
# ====================
# 🛠 LOAD DEPENDENCIES
# ====================
import os
import sys
import requests
from dotenv import load_dotenv
from IPython.display import display, Markdown
import re
[10]:
# ====================
# 🛠 LOAD ACCESS TOKEN
# ====================
load_dotenv(override=True)
ACCESS_TOKEN = os.getenv("ZENODO_SANDBOX_TOKEN")
DEFAULT_PLACEHOLDER = "paste_your_sandbox_token_here"

# ============================
# ✅ VALIDATE ACCESS TOKEN
# ============================
if not ACCESS_TOKEN or ACCESS_TOKEN == DEFAULT_PLACEHOLDER:
    print("\n❌ Access token is missing or still set to the default placeholder.")
    print("👉 Please open your `.env` file and replace the placeholder with your actual Zenodo Sandbox token:")
    print("   ZENODO_SANDBOX_TOKEN=your_actual_token_here\n")
    sys.exit(1)

print(f"✅ Access token loaded")

# ====================
# 🔗 ZENODO SANDBOX API
# ====================
ZENODO_SANDBOX_URL = "https://sandbox.zenodo.org/api/deposit/depositions"
HEADERS = {
    "Content-Type": "application/json",
    "Authorization": f"Bearer {ACCESS_TOKEN}"
}
✅ Access token loaded
Define metadata#
Before uploading a file to Zenodo, you must define the metadata that describes your dataset. This metadata helps make the dataset searchable, citable, and understandable. Zenodo expects metadata in a structured format, aligned with community standards like schema.org.
In this example, we define the following key fields:
title: A descriptive name for the datasetupload_type: Specifies the content type (e.g.,"dataset","software","publication")description: A brief abstract or summary of what the dataset containscreators: A list of contributors including:name: Full nameaffiliation: Institutional affiliationorcid: ORCID identifier (machine-readable researcher ID)affiliation_ror: ROR identifier for the institution (structured organizational ID)
keywords: Tags that make the record more discoverableaccess_right:"open","embargoed","restricted", or"closed"depending on data availabilitylicense: Specifies how the data can be reused (e.g.,"CC-BY-4.0"for Creative Commons Attribution)
✏️ Customize your metadata
Before running the notebook, make sure to update the metadata fields with your own information. Replace the following placeholders:
"Last Name, First Name"→ Your full name
"Organization Name"→ Your current institution or affiliation
"https://orcid.org/YOUR-ORCID-NUMBER"→ Your personal ORCID
"https://ror.org/YOUR-AFFILIATION-ROR-ID"→ Your organization’s ROR IDIf you don’t have an ORCID or ROR ID, you can temporarily remove those fields, but we recommend including them for better interoperability.
For a full description of all metadata fields and API endpoints, see the Zenodo REST API documentation.
[11]:
# ====================
# 📝 METADATA
# ====================
metadata = {
    "metadata": {
        "title": "Example Battery Dataset",
        "upload_type": "dataset",
        "description": "A simple CSV file representing battery time series data.",
        "creators": [
            {
                "name": "Clark, Simon",
                "affiliation": "SINTEEF",
                "orcid": "https://orcid.org/0000-0002-8758-6109",
                "affiliation_ror": "https://ror.org/01f677e56"
            }
        ],
        "keywords": ["battery", "time series", "example"],
        "access_right": "open",
        "license": "CC-BY-4.0"
    }
}
[12]:
# ============================
# VALIDATE ORCID AND ROR
# ============================

# This block is checking to validate that you have provided a value for the ORCID and RORID in the metadata snippet above.

# Regular expression patterns
orcid_pattern = r"^https:\/\/orcid\.org\/\d{4}-\d{4}-\d{4}-\d{4}$"
ror_pattern = r"^https:\/\/ror\.org\/[0-9a-z]{9}$"

creator = metadata["metadata"]["creators"][0]
orcid = creator.get("orcid", "")
rorid = creator.get("affiliation_ror", "")

# Check if ORCID and ROR ID are valid
valid_orcid = re.match(orcid_pattern, orcid)
valid_rorid = re.match(ror_pattern, rorid)

if not valid_orcid or not valid_rorid:
    display(Markdown("""
**❌ ORCID or ROR ID is missing or invalid.**
👉 Please update the metadata with your actual, properly formatted identifiers.

- ORCID should look like: `https://orcid.org/0000-0002-1825-0097`
- ROR ID should look like: `https://ror.org/05gq02987`
"""))
    sys.exit(1)
Create a Draft Record#
Once the metadata is defined, the next step is to create a private draft record in Zenodo (also called a “deposition”) that holds your data and metadata before publication. We use a POST request to the Zenodo API, sending the metadata as JSON along with the authentication headers. If the request is successful (status_code == 201), Zenodo returns a JSON response containing the deposition ID and other metadata.
response = requests.post(ZENODO_SANDBOX_URL, json=metadata, headers=HEADERS)
We extract the deposition_id from the response. This ID is required to:
Upload files to the correct draft record
Refer to the deposition in later actions (like publishing or deleting)
If the deposition is not created successfully, the script prints the error message and stops.
[13]:
# ====================
# 📤 CREATE DEPOSITION
# ====================
response = requests.post(ZENODO_SANDBOX_URL, json=metadata, headers=HEADERS)
if response.status_code == 201:
    deposition = response.json()
    deposition_id = deposition["id"]
    print(f"✅ Created deposition: {deposition_id}")
else:
    print("❌ Failed to create deposition:", response.text)
    exit(1)
✅ Created deposition: 409313
Upload a file#
After creating a deposition, the next step is to upload the dataset file. In this example, we upload a structured .csv file that follows the Battery Data Format (BDF) standard. We start by defining the path to the file and extracting the filename. Then we open the file in binary mode and use a POST request to send it to Zenodo. The upload endpoint is based on the deposition ID obtained earlier. If the upload is successful (status_code == 201), a confirmation message is printed. If
not, the error is displayed and the script exits.
ℹ️ Note:You can upload multiple files to the same deposition by repeating this process. All files must be uploaded before publishing the record.
[14]:
# ====================
# 📎 UPLOAD FILE
# ====================
file_path = "structured_battery_data.bdf.csv"
filename = os.path.basename(file_path)

with open(file_path, "rb") as file:
    files = {"file": (filename, file)}
    upload_url = f"{ZENODO_SANDBOX_URL}/{deposition_id}/files"
    r = requests.post(upload_url, files=files, headers={"Authorization": f"Bearer {ACCESS_TOKEN}"})
    if r.status_code == 201:
        print(f"✅ File '{filename}' uploaded successfully.")
    else:
        print("❌ File upload failed:", r.text)
        exit(1)
✅ File 'structured_battery_data.bdf.csv' uploaded successfully.
Publish the record#
Once the metadata and file upload steps are complete, the final step in the Zenodo workflow is to publish the deposition. This action finalizes the dataset and makes it publicly accessible in the Zenodo Sandbox. Publishing mimics what you would do in a real research scenario, where a DOI is minted and the record becomes part of a public repository.
🚨 Note:
Records that are published in the sandbox cannot be deleted! We strongly recommend using a dry run for test uploads.
Use dry run mode to avoid polluting the sandbox#
To give students or developers the full experience of creating and uploading metadata and files without leaving clutter behind, we include a dry_run option in the script. When dry_run = True, the script will:
Go through all the steps: load token, define metadata, create a deposition, and upload a file.
Stop before publishing, and instead delete the draft deposition.
Print a confirmation that the deposition was deleted.
dry_run = True
If you would like to publish a real record to the sandbox to get the full effect, then set:
dry_run = False
You should only do this once, to avoid creating duplicate records.
[15]:
# ====================
# SET DRY RUN VARIABLE
# ====================

dry_run = False
[16]:
# ====================
# ✅ PUBLISH OR DELETE
# ====================

if dry_run:
    print("🧹 Dry run enabled. Deleting test deposition...")
    r = requests.delete(f"{ZENODO_SANDBOX_URL}/{deposition_id}", headers=HEADERS)
    if r.status_code == 204:
        print("🗑️ Test deposition deleted successfully.")
    else:
        print("⚠️ Failed to delete test deposition:", r.text)
else:
    publish_url = f"{ZENODO_SANDBOX_URL}/{deposition_id}/actions/publish"
    r = requests.post(publish_url, headers=HEADERS)

    if r.status_code == 202:
        print(f"🎉 Dataset published: https://sandbox.zenodo.org/record/{deposition_id}")
    else:
        print("❌ Failed to publish dataset:", r.text)
🎉 Dataset published: https://sandbox.zenodo.org/record/409313
Summary#
In this notebook, you learned how to publish a structured battery dataset to the Zenodo Sandbox using their REST API. This hands-on workflow walks through every step needed to achieve 1-star battery data in the Five-Star Battery Data framework:
Step |
What You Did |
|---|---|
Create a token |
Generated a personal access token from the Zenodo Sandbox |
Define metadata |
Structured your dataset description using standard fields |
Create a deposition |
Created a new draft record to hold your files and metadata |
Upload your data |
Uploaded a |
Ran a dry run |
Practiced safely by deleting test records before publishing |
(Optional) Publish |
Finalized the record and generated a DOI-like URL |
By following this process, you’ve made your dataset:
Publicly accessible
Citable with a stable identifier
Reusable under a clear license
Discoverable through structured metadata
This notebook gives you a complete and reusable pattern for publishing scientific datasets in a FAIR and standards-aligned way.